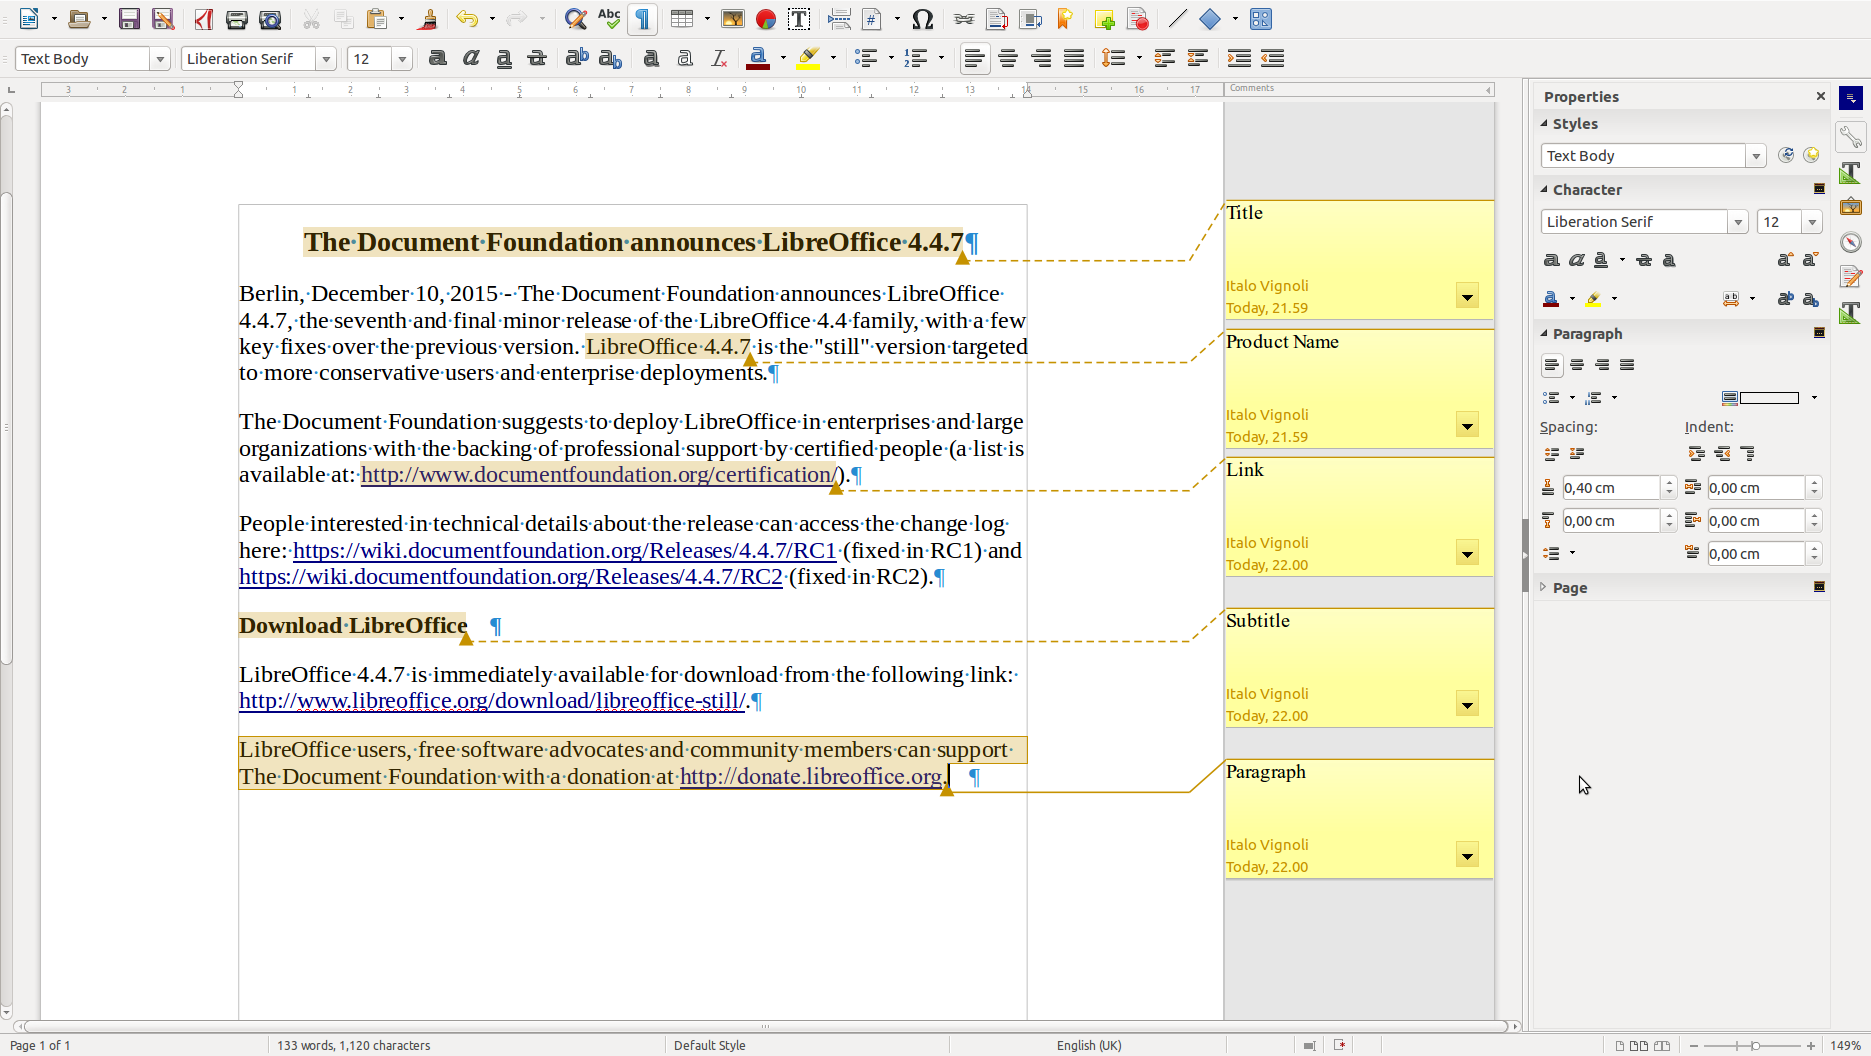
LibreOffice Writer was born – as StarWriter – to produce lengthy documents, such as thesis and relations, and as such offers a number of specific features in this area. Two of the most important are Templates and Styles, which facilitate the creation of good looking documents, and make it easier to reproduce a standard document once the layout – including Styles – has been defined and consolidated. LibreOffice offers an almost hidden feature to produce a Template, which can be accessed from the menu File > Send > Create Master Document. This opens a “save as…” dialog window, which allows to save the open document as a Template.
Category: Technology
LibreOffice: Advent Tip #6
LibreOffice offers an AutoText feature which can be accessed from the menu Edit > AutoText, which opens a simple dialog windows. The example shown in the image on the left is the well known Lorem Ipsum pseudo Latin blurb, which can be used to mimic a document layout, but the feature offers a number of pre-defined standard strings (for instance: 1st Reminder, 2nd Reminder, etcetera), plus several Business Cards layouts, plus a number of template elements (for instance: Header Brochure, Header Newsletter, etcetera). In addition, you can import a document to create your own AutoText elements. To insert the AutoText, you can either recall the dialog window or type the shortcut for the AutoText entry, and then press F3.
LibreOffice: Advent Tip #5
Today, a very simple tip, for all those people who are using LibreOffice and own a mouse with a scroll wheel (today, most mice have a scroll wheel, or are able to mimic the behavior of a scroll wheel).
LibreOffice allows to zoom a document from 20% (very tiny) to 600% (very large), independently from the application (Writer, Calc, Impress and Draw), by pressing the Control key on the keyboard and rotating the scroll wheel. You go from 20% to 600% by rotating the wheel forward, and from 600% to 20% by rotating the wheel backward.
Of course, the zoom speed is strictly related to a number of factors, so might not be as quick as the user would like. Start gently, and increase the speed with time, considering that a large document or a small RAM may slow down the process.
LibreOffice: Advent Tip #4
LibreOffice has a comprehensive AutoCorrect feature, which can be accessed from the menu Tools > AutoCorrect Options… The command opens a dialog window with five tabs: Replace, Exceptions, Options, Localized Options, and Word Completion. Replace provides a list of symbols and words which might be entered using the wrong character or misspelled, and will be corrected automatically once entered. The list can be improved by the user, with the addition of other words. Exceptions provides a list of the words which do not follow the rule, and can also be improved by the user with the addition of other words.


Options are pre-configured, and are correcting some of the most common typing mistakes, such as two initial capitals, double spaces, and empty paragraphs. Localized Options (no screenshot) provides some additions to the previous tab, related to specific language issues. Last, Word Completion provides a list of words which can be autocompleted by LibreOffice once the feature has been enabled.


LibreOffice: Advent Tip #3
LibreOffice Impress allows to create a nice Photo Album with a few clicks of the mouse. First, you open an empty presentation. Second, you access the feature with Insert > Media > Photo Album. Third, you press the Add button to select your pictures from your hard disk. Fourth, you choose your options (slide layout, caption, aspect ratio) and then press Insert Slides to create the Photo Album, and – in a few seconds – you get the final product.


LibreOffice: Advent Tip #2
Save Impress Slides as Images

LibreOffice allows to export single Impress slides as images, by accessing the menu File > Export…, and then by choosing one of the available file formats. Using this feature, exporting all the slides of an Impress presentation is a rather tedious operation.
Luckily, there is a LibreOffice extension which allows to export all slides as images in a single operation. In addition, it allows to choose the file format and configure the output.

To install the extension Export as Images, you have to access the LibreOffice Extensions website, search for the extension, download the OXT file, and install it using the Extensions Manager (which can be accessed from the menu Tools > Extension Manager…, then clicking on the Add… button, and following the instructions).

Once installed, Export as Images creates a new menu entry File > Export as Images…, which opens a dialog windows where you can choose the directory, the file name, the file format, the size (by entering the requested width or height in pixels), and color/grayscale.
