Immediately available for Linux, MacOS X and Windows
 Berlin, February 10, 2016 – The Document Foundation announces LibreOffice 5.1, a full featured open source office suite which compares head-to-head with every product in the same category, while standing out with superior interoperability features.
LibreOffice 5.1 offers a completely reorganized user interface, and several improved features targeted at enterprise deployments: better support for ODF 1.2, interoperability with proprietary document formats and file management on remote servers.
LibreOffice has been downloaded 120 million times since the launch in January 2011. The office suite is deployed by large organizations in every continent, with the latest addition being the Italian Defense Staff with over 100,000 desktops.
LibreOffice 5.1 Highlights
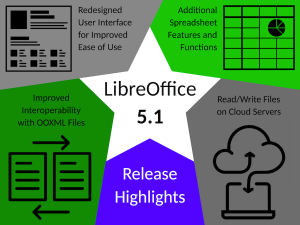 User Interface: LibreOffice 5.1’s user interface has been completely reorganized, to provide faster and more convenient access to its most used features. A new menu has been added to each of the applications: Style (Writer), Sheet (Calc) and Slide (Impress and Draw). In addition, several icons and menu commands have been repositioned based on user preferences.
Interoperability: Compatibility with proprietary document formats has been improved, as a part of the ongoing effort for a better interoperability with other productivity software. In addition, filters have been added for Apple Keynote 6, Microsoft Write and Gnumeric files.
Spreadsheet Functions: Calc’s formula engine has been improved with features addressing restrictions in table structured references and sticky column/row anchors, interoperability with OOXML spreadsheets and compatibility with ODF 1.2
File Access on Remote Servers: Files on remote file servers such as Sharepoint, Google Drive and Alfresco can now be accessed from the File menu, with read and write options, without the need of a dialog window.
A complete list of the most significant new features is available in the accompanying press release (LibreOffice 5.1 New Features), and has also been published on the website at http://www.libreoffice.org/discover/new-features/. Short videos presenting the most significant new features for Writer, Calc and Impress are available at: https://www.youtube.com/playlist?list=PL0pdzjvYW9RHSwdRnZfaxAWICrkBrQl7k.
LibreOffice 5.1 has also been improved “under the hood,” thanks to the work of hundreds of volunteers. This translates into an open source office suite which is easier to develop, maintain and debug. Although this is not visible to users, it is extremely important for enterprise deployments.
“LibreOffice 5.1 is another step forward to fulfilling our vision of an office suite tailored on user needs and preferences”, says Bjoern Michaelsen, a Director at The Document Foundation (TDF) and a leading LibreOffice developer. “Since 2010, we have gone through different development cycles to clean up the code and make it more responsive. We are now at a stage where we are close to providing a better user interface.”
“LibreOffice’s third development cycle is leading us to a new user interface concept, where the user will be able to choose the best layout of the elements on the screen for his own needs, to leverage desktop space in the best way” adds Jan Holesovsky, a Director at TDF, and a member of the design team.
Availability and enterprise deployments
LibreOffice 5.1 represents the bleeding edge in term of features for open source office suites, and as such is targeted at technology enthusiasts, early adopters and power users.
For enterprise class deployments, TDF maintains the more mature 5.0.x branch (soon at 5.0.5). In any case, TDF suggests deploying or migrating to LibreOffice with the backing of certified professionals providing Level 3 support, migration consultancy or trainings according to recognized best practices (http://www.libreoffice.org/get-help/professional-support/).
LibreOffice 5.1 is immediately available from the following link: http://www.libreoffice.org/download/. LibreOffice users, free software advocates and all community members can support The Document Foundation with a donation at http://donate.libreoffice.org.
Launch Pack and Screenshots
The entire launch pack, with background documents and the high resolution images, can be downloaded from: http://tdf.io/lo51launchpack. Some Windows 10 screenshots can be downloaded from: http://tdf.io/lo51screenshots.

 Berlin, February 15, 2016 – The Document Foundation announces LibreOffice 5.0.5, the fifth release of the LibreOffice 5.0 family. Following the announcement of LibreOffice 5.1, LibreOffice 5.0.5 becomes the “still” version (a stable version that has undergone more testing over a longer time), and can be used for the deployment in large organizations.